https://cassia-re12.blogspot.com.br/p/contato.html

REDES SOCIAIS

Mostrando postagens com marcador Amigurumi Pattern. Mostrar todas as postagens

sábado, 21 de setembro de 2019

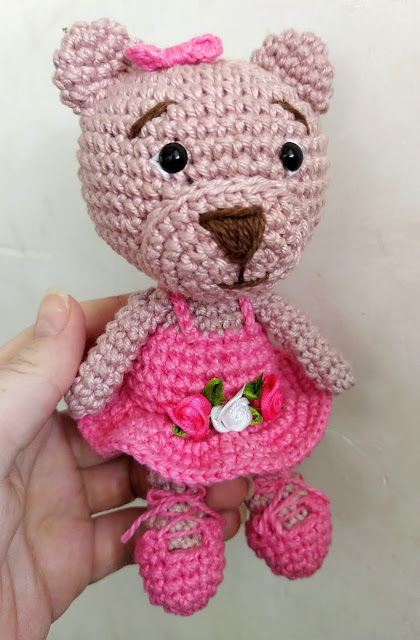
Little Bear Ballerina Lili Amigurumi Pattern

Hello friends, today I bring you another pattern of amigurumi very easy, I did with love, I hope you enjoy

Pink cotton thread
Brown cotton thread
Crochet hook 2.5mm
Eyes 7mm
Silicone Fiber Filling
Tapestry needle

Measurement of finished piece: 18 cm standing / 14 cm seated

Execution:


Head and Body:

1 ) Magic ring 6 sc
2) inc around (12)
3) *1 sc, 1 inc* x6 (18)
4) *2sc, 1 inc* x6 (24)
5) *3sc, 1 inc* x6 (30)
6) *4sc, 1 inc* x6 (36)
7) *5sc, 1 inc* x6 (42)
8-14 )  sc around (42)

15) *5sc, 1dec* x6 (36)
16) *4sc, 1dec* x6 (30)
17) *3sc, 1dec* x6 (24)
18) *2sc, 1dec* x6 (18)
19) *1sc, 1dec* x6 (12)

20) *3sc, 1inc* x3 (15)
21) *4sc, 1inc* x3 (18)
22) *2sc, 1inc* x6 (24)

Switch to pink

23) sc around (24)
24) *3sc , 1inc* x6 (30)
25-28)  sc around (30)
29) sc around bloc
30) *3sc, 1dec* x6 (24)
31) *2sc, 1dec* x6 (18)
32) *1sc, 1dec* x6 (12)
33) 6 dec (6)

Place eyes between 9/10 lines with 5 points separacion

Ears (x2)
1 ) Magic ring 6 sc
2) inc around (12)
3-4) sc around

Tutu :
In the line where we get the point only on the back rope, attach the line


1) 1sc , 1 inc around
2) 1sc, 1inc around
3) sc around
No need to have an accurate account

Nose:
 1) 5 chain , 1 sc second chain , 2 psc , 3 sc in the last chain , 2 sc
 1inc (10sc)
2) 1inc , 2sc , 3 inc , 2sc , 2 inc (16sc)
3) 1sc , 1 inc , 2 sc , *1 sc, 1inc*( x 3)  , 2 sc , 1 sc , 1 inc, 1sc , 1inc (22sc)
4) sc around

Legs:
1 ) Magic ring 6 sc
2) inc around (12)
3-5) sc around (12)
6) *1dec, 1sc* x3 (9)
7-10) sc around
Arms:
1 ) Magic ring 6 sc
2-9)  sc around

To make the dress strap, make two strings with 13 chains and sew
Hair tie:
Magic ring , 3 chain , 2 dc , 3 chain , sl st, 3 chain , 2 tr , 3 chain , sl st
Close the magic ring , make a few turns of wire right in the center , of a knot and leave thread to sew on the piece

Shoes :

1 ) Magic ring 6 sc
2) inc around (12)
3) *3sc, 1inc* x3 (15)
4-5) sc around  , turn
6) 13 sc
With a piece of thread pass with a needle at the ends, braid and tie on the foot of our little bear

Decorate the dress as you prefer, I glued satin flowers 🥰

terça-feira, 10 de julho de 2018

Lhasa Apso Amigurumi Pattern English Version

One more piece ready and I'm in love
This work was a great challenge for me. , the deadline was short and I'm very anxious , so it was not easy , I undid it , I cried , I persisted And there it is haha , I was very happy with the result ,  While I was doing, I was writing for you. , I hope you enjoy it and enjoy it

Materials:
2 yarn white of 100 grs
1 pair of eyes with 20mm 
Crochet needle 3,5
Silicone fiber to fill amigurumi

Black woolen nieces for the nose

Head: 

1) Magic Ring whit 6 sc  (6)
2) * 1 sc + 1 loop stitch together* x6  (12)
3) * 1 sc , sc inc * 6 x (18)
4) * 2 loop stitch  loop stitch inc* 6x (24)
5) * 3 sc , inc * x 6 (30)
6) * 4 loop stitch ,  loop stitch inc* 6x (36)
7) * 5 sc , inc* x 6 (42)
8) * 6 loop stitch , loop stitch inc* 6x (48)
9) * 7 sc, inc* x 6 (54)

10 - 19 ) Loop stitch and sc  (one around of each )

20) * 7 loop stitch,  dec loop stitch * 6x (48)
21) * 6 sc ,  dec * x 6 (42)
22) * 5 loop stitch,  dec loop stitch * 6x (36)
23) * 4 sc , dec * x 6 (30)
24) * 3 sc , dec * x 6 (24)
25) * 2 sc , dec * x 6 (18)
26) * 1 sc , dec * x 6 (12)
27) 6 dec (6)

Snout: 

1) Mr 6 sc (6)
2) sc inc around (12)
3) * 1 sc , inc* x6 (18)
4) loop stitch , 1 loop stitch inc* 6x (24)
5) * 3 sc , inc* x6 (30)

6 - 9 ) Loop stitch and sc  (one around of each )

Embroider nose and mouth, or can use nose with safety catch


Ears: 


1) 10 chain  + 2 for up
Turn the work over and make a sc on the second chain , sc around , turn (10)
2) 10 loop stitch , turn
3) 10 sc turn
4)  10 loop stitch , turn 
5)  10 pb turn
6)  loop stitch dec ,  6 loop stitch , loop stitch dec (8)
7)  8 sc 
8) loop stitch dec , 4 sc loop stitch dec (6)
9) loop stitch dec , loop stitch , loop stitch dec (4)


Body


1) Magic Ring whit 6 sc  (6)
2) * 1 sc + 1 loop stitch together* x6  (12)
3) * 1 sc , sc inc * 6 x (18)
4) * 2 loop stitch  loop stitch inc* 6x (24)
5) * 3 sc , inc * x 6 (30)
6) * 4 loop stitch ,  loop stitch inc* 6x (36)
7) * 5 sc , inc* x 6 (42)
8) loop stitch , loop stitch inc* 6x (48)

9 - 29 )  Loop stitch and sc  (one around of each )

30) * 6 sc , dec * x6 (42)
31) * 5 loop stitch , loop stitch dec* 6x (36)
32) * 4 sc , dec * x6 (30)
30) sc around


Front legs (2) : 


1) Magic Ring whit 6 sc  (6)
2) sc inc around (12)
3) * 1 sc ,  inc* x6 (18)
4) * 2 sc , inc * x6  (24)

5 -8 ) sc around (24)

9) * sc , sc , dec * x6 (18) close with sl st , turn the work over and start working from the inside out
10) sc around (18)

11- 25) Loop stitch and sc  (one around of each )


Rear legs (2)

1) Magic Ring whit 6 sc  (6)
2) sc inc around (12)
3) * 1 sc , inc * x6  (18)
4) * 2 sc , inc * x6  (24)
5) * 3 sc , inc * x6  (30)

6 - 8 ) sc around (30)

9) 3 sc , (*dec , 1 sc * x 5) , 12 sc  (25)
10) 3 sc , (*dec , 1 sc* x 5) , 7 sc (20)
11) sc around , close with sl st , turn the work over and start working from the inside out
12) sc around
13- 18) Loop stitch and sc  (one around of each )


Tail : 

1) Magic Ring whit 6 sc  (6)
2) sc inc around (12)
3) * 1 sc , inc * x6  (18)
4 - 8 ) sc around (18)


Sorry for any errors I do not speak English, but I hope to help you.

Thank you for visiting my blog.


Here below I leave the video for those who still do not know how to do this point


segunda-feira, 29 de janeiro de 2018

Melancia Amigurumi


Olá amigos tudo bem com vocês , hj venho trazer esse gráfico de melancia em amigurumi , atraves dele (não sei de quem é a criação) eu fiz a melancia para acompanhar a boneca para a decoração da festa de 1 aninho da minha sobrinha , quebrei muito a cabeça mas consegui fazer, espero que também consigam 😘😘


terça-feira, 12 de setembro de 2017

Giraffe Amigurumi Pattern English Version

Hello dear, how are you?
It's been a while since I've been promising the pattern for this little giraffe for you, I made my first one but I did not write it down, I did the second writing the recipe and lost it, I did the third with the tight deadline and did not have time to write down ... now " until finally "I managed to write everything down for you, I know that there are lots of pattern on the net but I wanted to make mine and share with you, I hope you like it
 Body:
Yarn yellow
1) 6 sc
2) Inc x 6 (12)
3) 1sc , 1 inc x6 (18)
4) 2sc , 1 inc x6 (24)
5) 3sc , 1 inc x6 (30)
6) 4sc , 1 inc x6 (36)
7) 5sc , 1 inc x6 (42)
8) 6sc , 1 inc x6 (48)
9 - 13 ) sc around (48)

14) 14sc , 1 dec  , x3 (45)
15) sc around (45)
16) 13sc , 1 dec  , x3 (42)
17) sc around (42)
18) 12sc , 1 dec  , x3 (39)
19) sc around (39)
20) 11sc , 1 dec  , x3 (36)
21) sc around (36)
22) 10sc , 1 dec  , x3 (33)
23) sc around (33)
24) 9sc , 1 dec  , x3 (30)
25) sc around (30)
26) 8sc, 1 dec  , x3 (27)
27) sc around (27)
28) 7sc , 1 dec ,x3 (24)
29) sc around (24)
30) 6sc , 1 dec  , x3 (21)
31) sc around (21)
32) 5sc , 1 dec  , x3 (19)
33) sc around (19)
34) 4sc , 1 dec  , x3 (15)
35) sc around (15)
36 - 39) sc around

Head:
Let's start with the white thread
Make the magic ring and put 6 PB

2) Inc x 6 (12)
3) 1sc , 1 inc x6 (18)
4) 2sc , 1 inc x6 (24)
5) 3sc , 1 inc x6 (30)
6) 4sc , 1 inc x6 (36)
7) 5sc , 1 inc x6 (42)
8 - 14) sc around (42)
15) 5sc , 1 dec x6 (36)

Change color to yellow

16) sc around (36)
17) 5sc , 1 inc x6 (42)
18 - 26) sc around (42)
27) 5sc , 1 dec x6 (36)
28) 4sc , 1 dec x6 (30)
29) 3sc , 1 dec x6 (24)
30) 2sc , 1 dec x6 (18)
31) 1sc , 1 dec x6 (12)
32) 6 dec

Ears (2) :
1) 6 sc
2) 1sc , 1inc x3 (9)
3) 2sc , 1inc x3 (12)
4 - 7) sc around (12)


Arms (2)

With the brown line make magic ring with 6 sc
2) inc x6 (12)
3) 1 sc , 1 inc x6 (18)
4 - 7) sc around
Change color to yellow
8) 1sc , 1 dec , x 6 (12)
9 - 13) sc around

Legs (2) :
With the brown line make magic ring with 6 bp
2) inc x 6 (12)
3) 1sc , 1 inc x6 (18)
4) 2sc , 1 inc x6 (24)
5 - 10) sc around (24)
11) 2sc , 1 dec x6 (18)
Change color to yellow
12) sc around (18)
13) 4 sc , 1 dec , x3 (15)
14 - 22) sc around

Horn (2) :
With the brown line make magic ring with 6 bp
2) inc x 6 (12)
3 - 4 ) sc around
Change color to yellow
5 até 12) sc around

Tail:
Magic Ring 6 bp
Before closing the ring, put some brown threads with a knot inside so that it does not escape, close the magic ring
2) 1sc, 1 inc x3 (9)
3 - 6) sc around

To make the spots make circles with the brown line big and small and distribute sewing where you prefer

domingo, 10 de setembro de 2017

Bear Amigurumi Pattern English Version

Amigurumi Teddy Bear - Pattern

Hello, my friends, good morning, I came to bring you the recipe of this teddy bear of my own, I hope you like it.

The head and the body are made together, if you want to make the body of another color as if it were a clothes, just change the color of the line from the 27th career


Abbreviations of the points:


Materials used:
120 grams brown yarn, eyes with safety catch, siliconized fiber, crochet hook 3,5, sewing needle to sew as parts and embroider muzzle and wool remnants to the muzzle (this amount of wool is for the new born)  

Head and Body

1: 6sc in magic circle (6)
2: (sc, inc) x6 (12)
3: ( 1 sc, inc) x6 (18)
4: (2 sc, inc) x6 (24)
5: ( 3 sc, inc) x6 (30)
6: ( 4 sc, inc) x6 (36)
7: ( 5 sc, inc) x6 (42)
8: ( 6 sc, inc) x6 (48)
9 até 19 : sc around (48)

20: ( 6 sc, dec) x6 (42)
21: ( 5 sc, dec) x6 (36)
22: ( 4 sc, dec) x6 (30)
23: ( 3 sc, dec) x6 (24)
24: ( 2 sc, dec) x6 (18)
25: sc around (18)
26: ( 2 sc, inc) x6 (24)

If you want to make the clothes of another color change the line now

27: ( 3 sc, inc) x6 (30)
28: ( 4 sc, inc) x6 (36)
29: ( 5 sc, inc) x6 (42)
30 até 42 : sc around (42)
43: ( 5 sc, dec) x6 (36)
44: ( 4 sc, dec) x6 (30)
45: ( 3 sc, dec) x6 (24)
46: ( 2 sc, dec) x6 (18)
47: ( 1 sc, dec) x6 (12)
48: dec around (6)


Arms:

1: 6sc in magic circle  (6)
2:  (sc, inc) x6  (12)
3:  (1, inc) x6 (18)
4 até 6 : sc around (18)
7: ( 1 sc, dec) x6 (12)
8 até 17: sc around
18: dc around (6)

Legs:

1: 6sc in magic circle   (6)
2: (sc, inc) x6  (12)
3: (1, inc) x6 (18)
4: (2, inc) x6 (24)
5: 7 sc , (1 dec , 2 sc  2 x) , 1 dec , 7 sc (21)
6: 9 sc , 1 dec , 10 sc (20)
7: 6 sc , 1 dec, 3 sc , 1 dec, 7 sc (18)
8: *7 sc , 1 dec * 2 x (16)
9: 5 sc , 1 dec, 1 sc , 1 dec, 6 sc (14)
10: 4 sc , 1 dec, 1sc , 1 dec, 5 sc (12)
11 - 18 : sc around (12)


Ears:

1: 6sc in magic circle (6)
2: (sc, inc) x6  (12)
3: (1, inc) x6 (18)
4 até 8: sc around (18)


Snout:

1: 6sc in magic circle (6)
2: (sc, inc) x6  (12)
3: (1, inc) x6 (18)
4: (2, inc) x6 (24)
5 até 8: sc around
Embroider the nose with tapestry needle

For the beginners, this post is not intended to teach, however there are many tutorials on the internet and for those who already crochet will catch the morning fast!


Sorry, I do not speak English, I hope you understand the pattern.